How to Download and Install PostgreSQL on Windows
PostgreSQL is a powerful, open-source relational database management system (RDBMS) known for its robustness and reliability. Whether you’re a developer, database administrator, or just someone looking to explore the world of databases, PostgreSQL is a fantastic choice. In this tutorial, we’ll walk you through the process of downloading and installing PostgreSQL on a Windows operating system, ensuring a seamless installation experience.
Why Choose PostgreSQL
Before we dive into the installation process, it’s essential to understand why PostgreSQL is a popular choice:
- Open Source: PostgreSQL is free to use, making it cost-effective for businesses and individuals.
- Extensibility: Its extensive range of extensions allows you to customize your database to fit your specific needs.
- Strong Community: PostgreSQL has a dedicated and active user community that provides support and updates regularly.
- Data Integrity: It ensures data integrity through advanced features like ACID compliance and referential integrity.
Prerequisites for Installing PostgreSQL on Windows
Before you start the installation process, ensure you have the following:
- A Windows-based computer (32-bit or 64-bit).
- Sufficient storage space for the installation.
- Administrator privileges on your Windows account.
Downloading PostgreSQL
To download PostgreSQL on Windows:
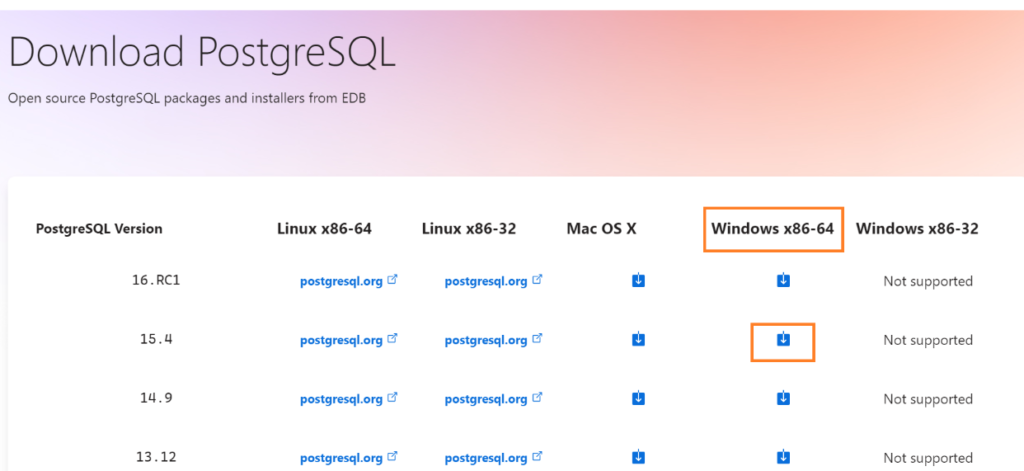
1. Open your browser and visit the official PostgreSQL download page at EnterpriseDB

2. Select the appropriate version for your Windows system (32-bit or 64-bit). Choose the latest PostgreSQL stable version for optimal performance and security. We choose PostgreSQL 15.4
Click on the download link to start the download of the PostgreSQL installer
Installing PostgreSQL
Once the download is complete, follow these steps to install PostgreSQL:
1. Locate the downloaded installer file and double-click it to run the PostgreSQL installation wizard. Click on Next to Proceed

2. Choose the installation directory. The default location is usually suitable, but you can change it if necessary. Click on Next to Proceed

3. Select the below components, you may uncheck Stack Builder. Click on Next to Proceed

4. Specify the data directory, where PostgreSQL will store its databases. You can also customize this location if needed. Click on Next to Proceed

5. Set a password for the PostgreSQL superuser (“postgres”). Ensure it’s strong and memorable, as you’ll need it later. Click on Next to Proceed

6. Choose the port number for PostgreSQL. While the default is 5432, you can change it if there are conflicts with other software on your system. Click on Next to Proceed

7. Select Locale in Advanced Options. Click on Next to Proceed

8. Review the Pre Installation Summary, Click on Next to Proceed

9. Get Ready to Install

10. Installation has been started, it will take a while to Install

11. Installation has been completed, Click on Finish

Accessing PostgreSQL
pgAdmin is one of the way to access PostgreSQL on Windows, checkout this to see different ways of connecting PostgreSQL
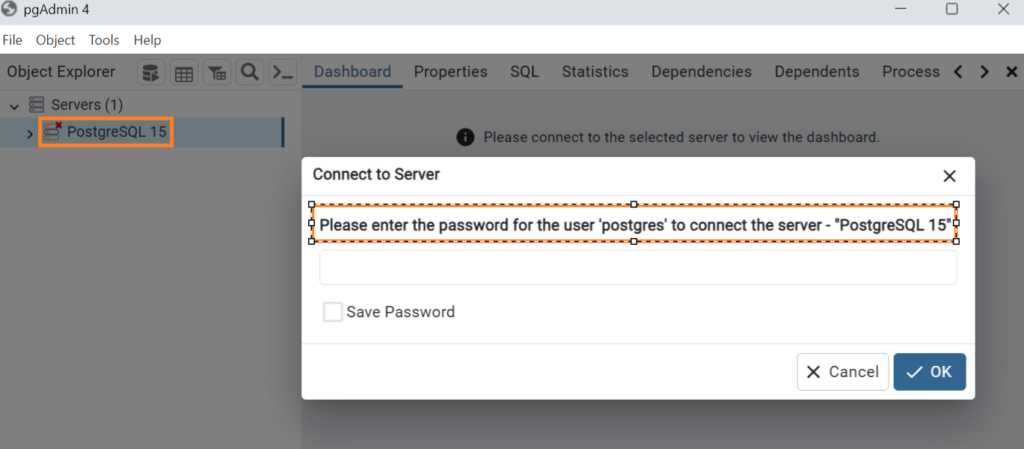
Open pgAdmin by searching it from the Start button, after opening it double click on the version PostgreSQL 15. Connect to your PostgreSQL instance using the superuser credentials which we had set during installation.

You’re now ready to create and manage databases, tables, and data.
Conclusion:
In this post, we have covered the steps to download and install PostgreSQL on a Windows system. PostgreSQL’s robust features and open-source nature make it a top choice for managing your relational databases. Whether you’re developing applications or managing data for your organization, PostgreSQL’s versatility and reliability will serve you well.
Now that you’ve successfully installed PostgreSQL, explore its rich ecosystem and start harnessing the power of this exceptional database management system for your projects.


